Sunday 30 December 2012

How to Select Messages in Gmail for Android

How to Select Messages in Gmail for Android


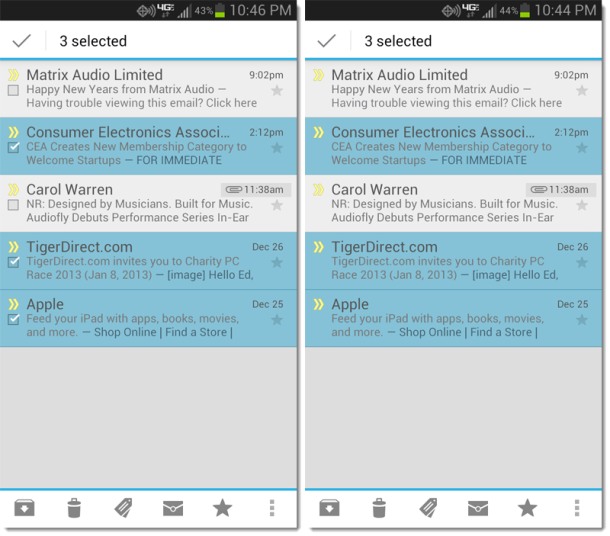
The latest update to the Gmail app (4.2.2) for Android has provided some welcome new features, like pinch-to-zoom and swipe-to-delete. Another new feature you might not be aware of is hiding check boxes.To select multiple e-mail messages in Gmail for Android, you have to tap the tiny check boxes to the left of each message. If you miss the check box and tap the message instead, the message launches and you have to go back to the conversation list and try again.Google added a new setting that will remove the check boxes entirely, and allow you to perform a long-press to enable selection mode. Once in selection mode, you can tap on the entire message listing to select it, rather than a tiny check box.


                                         select multiple messages      the better, long-press
                                         using check boxes(left)        method (right)


To enable long-press selections, go to Settings > General settings > Hide checkboxes.


Now you can select multiple messages in Gmail for Android without the frustration of having to tap tiny check boxes.
Read More

Saturday 15 December 2012

How to Use Kies to back up and restore your Samsung mobile

How to Use Kies to back up and restore your Samsung mobile


Samsung Kies desktop software can sync your Samsung smartphone or tablet to your computer. If you haven't used Kies before, then you may not know that it can also back up the data on your Samsung device. With a Google account, a lot of your data already syncs with Google's servers, but Kies can also back up Samsung-specific apps, like S Planner and S Memo, which come on the Galaxy S3.

Back ups

Step 1: After installing Kies Windows or Mac on your computer, connect your Samsung smartphone or tablet to your computer via a USB data cable.

Step 2: Confirm that Kies is connected to your Samsung device. Once connected, you'll see basic information about your device in the first tab.


Step 3: Click on the Back up/Restore tab and choose the items you want to back up, then scroll to the bottom of the window and click the Backup button.


Step 4: Wait for your backup to finish, then click the Complete button.


Restore


Step 1: In the Back up/Restore tab, scroll all the way to the bottom and click the Restore button. When you get the warning message about closing running applications, click Continue.


 Step 2: Choose the backup file to restore, then click Next.


Step 3: Select the data you want to restore, and make sure you want to restore the backup to your device. This is your last chance to back out of the restore. If you're sure you want to restore your data, click Next.


Step 4: Once the restore completes, you'll see a confirmation dialog box, and your device will reboot.


Now you know how to back up and restore your Samsung mobile device using Kies and your computer. We've confirmed that Kies works with a Samsung Galaxy S III smartphone and a Galaxy Tab 10.1 tablet.
Read More

Thursday 13 December 2012

GOOGLE SOLVES BANNERS AD CLICKS WITH CONFIRMATION BUTTION

GOOGLE SOLVES BANNERS AD CLICKS WITH CONFIRMATION BUTTION


THERE little more annoying than trying to dismiss a banner ad within an app only to miss your mark they make those X's so tiny ,after all.It's not that clicking the ad giving the developer is so horrible that we try to avoid it at all anges,but when you"re in the middle of a game or trying to read through your social networking timelines it is quite the nuisance to be kicked over to  the browser.

GOOGLE found a way to fix that little issue with the latest update to adwords.If you happen to click an edge of an ad,the ad will now display a quick prompt asking if you want to be taken to the ads destination.Its a very small and simple change,but one that makes a lot of sense and will save users a lot of headache and trouble.

Mobile ads are unique in that the lack of precision compared to a mouse and the disruptive action of being kicked out of an app is something that can ruin the user experience for many. Even full screen ads can remain an issue. Take the Scarface game, for instance the game uses full screen ads after certain action that require multiple button presses.Since these occurrences can be random it is easy to click one inadvertently.

It was so bad that the game was completely undesirable to play no matter how fun it was. I completely uninstalled it, and that was that.Its great that google is finally doing something about it,and while developers might not like the missed revenue from those random, accidental clicks that occur they should take solace in the fact that users will be a lot happier to use ad enabled apps
Read More

Tuesday 11 December 2012

How To Take Nandroid backups without rebooting

How To Take Nandroid backups without rebooting 


How To: Take Nandroid backups without rebooting

Android-based smartphone users today would definitely know the terms ‘Rooting’, ‘ROM flashing’ and ‘Nandroid’. Those who constantly keep flashing their phones with new ROMS, tweaks and updates would know the importance and criticality of taking backups before flashing their phones. Backing up the presently installed and working operating system before flashing a new ROM or tweak involves performing Nandroid. This means one would have to turn off the phone and reboot it into the recovery mode, then select the backup function and perform the Nandroid. The entire procedure wastes a lot of time rebooting the phone and most importantly, you spend a lot of time keeping your phone offline and might even miss important calls and messages.


There is a very fast and easy method by using a simple app to take a complete ROM backups android without switching off your phone.No doubt, installing aROM or flashing a tweak would still require you to switch off the phone and do the needful in the recovery mode.However, using this method you can at least save on 60%of your time.This method can also benefit those who keep installing various apps and lik to play with different scripts and kernel tweaks.They Would prefer to take repeated backups of their ROMS before and after the tweaking.

The app we are about to show you is available for free on the Google Play Store and is developed by Ameer Dawood. He developed this app because he constantly does Nandroid backups and does not want to waste time rebooting and entering the recovery mode. We shall show you how you can do the same. Before we get down to it, you would need to download and install two apps on your phone. The first is Online Nandroid and the second one is BusyBox installer.


Online Nandroid is the tool that takes Nandroid backups while your OS is online, and you do not need to reboot into the recovery mode for backups anymore. The app backs up the partitions such as boot, recovery, system, data, cache, cache data, dalvik cache, .android_secure, sd-ext, Appslog and any other partitions you have on your phone. The date format used for folder name is the same used by CWM itself and Nandroid backups created with Online Nandroid can safely be restored using CWM recovery.
 
Get started. Before you begin, you need to make sure you have the latest version of BusyBox or at least version 1.20 and above. For this, start the BusyBox app and update the version over the Internet. If you run the Online Nandroid app, the utility will also detect the BusyBox version and exit if the requirements are not met. Now start the Online Nandroid app. Online Nandroid is actually a script with a graphical user interface that runs in the background and takes the backups. You need to install this script initially and Online Nandroid will automatically do it for you. Once you click on the app, you will be greeted with a large dialog box stating that you don’t have the script and prompting you to download it click ‘Yes’. The new version of the script will be automatically downloaded and installed at the required location. Later, the display will give you details of the script version on screen. You are now ready for a Nandroid without rebooting.


On the Online Nandroid screen, select the name format you would like for your backups. You have a choice between custom name, UTC time zone name and phone time zone name. Preferred option would be a custom name as you can add the ROM name, date and time as per your choice. Select the custom name and hit the ‘Start Backup’ button. The next screen will ask for a confirmation and the screen after that will prompt you to enter the custom name for your backup. Feed in the requirements and click on the ‘OK’ button. The backup will start immediately and you can see the entire process in verbose mode on your screen. Depending on your phone’s speed and ROM type, the entire process can take anywhere between 5-10 minutes.


The backups are finally stored in the folder ‘/SDCARD/ClockWorkMod/Backup/<your custom backup name>/’. You can safely restore this backup anytime using the recovery mode.
Read More